The biggest problem with metal models is that the joins aren't as tight as plastic models. I guess it's just the nature of the beast. Above you will see one of the joins that has been pinned and glued in place. It should be a nice strong bond, but it's pretty ugly.

I usually start this process by rolling out a thin rope of green stuff (the thinner the better).
Here's your first tip: When working with any polymer putty (green stuff, brown stuff, grey stuff), have a smooth surface on which to work. I use a piece of plastic that used to be the front of a picture frame.
There are several reasons for this. It protects your work surface. This is especially important if work on a wooden desk or some other porous surface. The putty doesn't stick to very smooth surfaces very easily like it does to porous ones. Also, it's easier to thoroughly clean this surface before every use. Putty will pick up dust and grit on your work surface and this will show in your final product. Instead of being smooth, the putty will be gritty.
 Anyway, after I've rolled out my rope on a suitably smooth surface, I apply it to the gap.
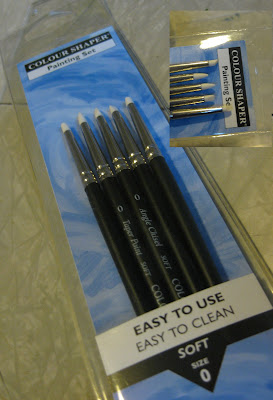
 Then I pull out these...

I've heard them called a lot of of things but the set I have calls them "colour shapers." I've also seen them labeled clay shapers. My set was made by Royal Sovereign and I'm not sure if anyone else makes them. I got the idea to use them from this project log on Warseer.
Green stuff barely sticks to the smooth, silicone tips, so they're great for moving putty around and especially smoothing it.
 I take the colour shapers and begin to smooth it into the gap. It became pretty obvious pretty quickly that I had used way too much green stuff (see my notes at the end).
 I used my hobby knife to trim the excess putty away from the gap and went back to smoothing.
After several rounds of smoothing and trimming, I have a nice smooth transition. At least I hope I do. The moment of truth will come when I actually paint the thing!
Notes:
I bought my colour shapers at Dick Blick and there's plenty of info on their website. This is not an endorsement of this store. It just happens to be close to my office.
I bought the mini set of 5 (Soft, Size 0). While very little sticks to them, you can get even better performance if you keep them wet while using them (you could just lick them). Keeping your tools wet, is a fundamental step when using putty
When working with Green stuff I always find that I mix way too much. I've gotten better and better at it. A tip I read recently on From the Warp suggests estimating the amount you'll need and then make only half of that. you can always mix more if you need it, but if you mix it and don't use it, you're just wasting.


1 comment:
I was unaware of that tool. Very cool.
Post a Comment